Step 2: Add the Growing Medium
Before adding soil, place a layer of small stones, gravel, or charcoal at the bottom of the bottle to improve drainage. This step is optional but helps keep the roots from sitting in water.
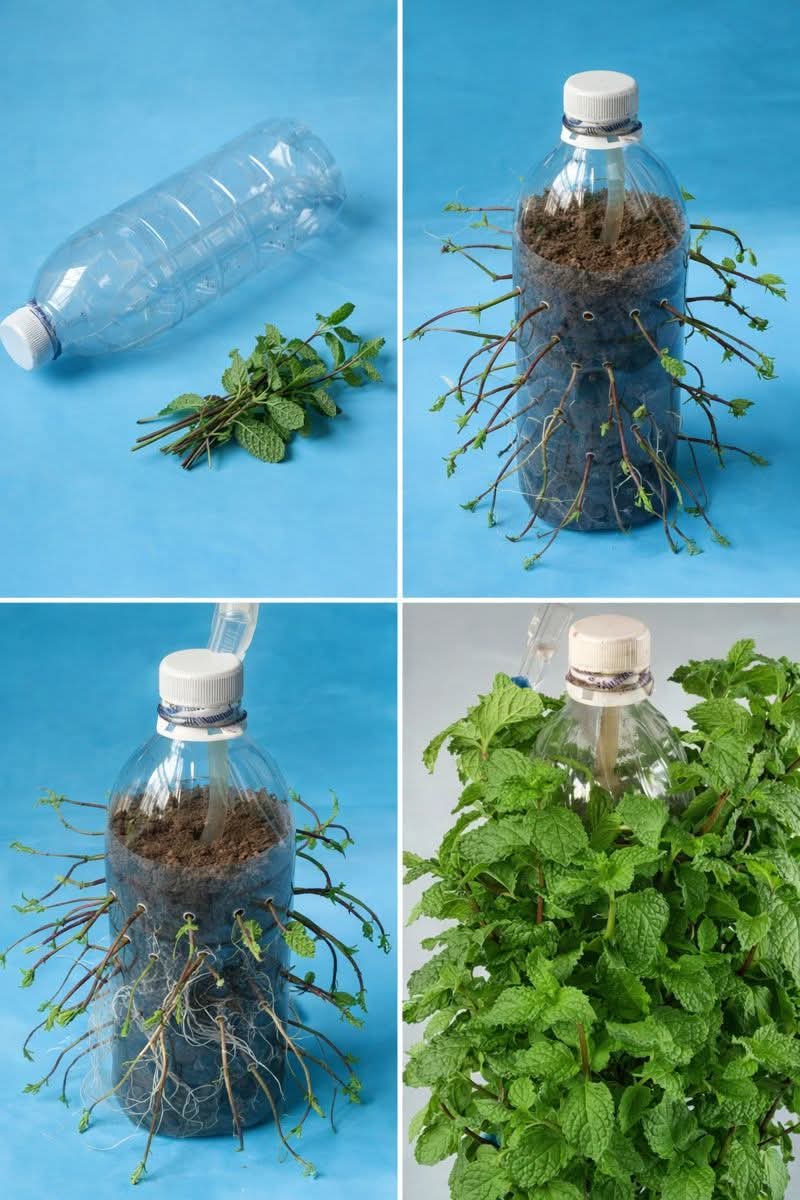
Fill the rest of the bottle with a well-draining potting mix. Mint prefers slightly moist soil but doesn’t do well in soggy conditions. A mix that contains coconut coir, compost, or perlite works well for growing mint in containers.
Step 3: Planting the Mint
There are two common ways to grow mint: from a cutting or from a small plant. If you have a mint cutting, remove the lower leaves and place the cutting in water until roots begin to form (about 5–7 days). Once the roots are visible, transplant the cutting into the prepared bottle.
Alternatively, if you have a small mint plant or starter from a nursery, you can simply transplant it into the bottle, making sure the roots are well-covered with soil and the plant sits upright.
Water the plant gently after planting to help it settle into the soil.
Step 4: Find the Right Spot
Mint thrives in bright, indirect sunlight. Place your plastic bottle planter near a window, on a balcony, or in any area that gets around 4–6 hours of light daily. Avoid exposing the plant to intense midday sun, especially in hot climates, as this can cause the leaves to wilt.
If you’re using several bottles, you can hang them on a vertical rack or fix them to a wall or railing using wire or zip ties, creating a vertical herb garden that’s space-saving and attractive.
Step 5: Water and Maintain
Mint loves moisture but doesn’t like soggy roots. Check the soil regularly and water when the top layer feels dry. If you’re using a self-watering bottle design, refill the bottom reservoir as needed. In hot weather, you may need to water daily, while in cooler conditions, every few days should be sufficient.
Prune the mint regularly to encourage bushier growth and prevent the plant from getting leggy. Pinch off the growing tips and harvest leaves often — mint will respond by growing fuller and faster.
If your mint begins to flower, you can snip off the flower buds to keep the leaves flavorful and extend the harvesting period.
Step 6: Enjoy and Multiply
Mint grows quickly and can be harvested continuously once it’s well established. Simply snip the stems and leaves as needed for tea, cooking, or garnishing.
As the plant matures, you can take additional cuttings to propagate new plants in other bottles or containers. This makes mint a great herb to share with friends or expand into a mini herb garden.
Final Thoughts
Growing mint in plastic bottles is a brilliant, eco-friendly gardening method that suits any lifestyle. It’s perfect for beginners, requires minimal space, and makes use of everyday materials you likely already have at home. Whether on a windowsill, balcony, or backyard wall, you can enjoy fresh, aromatic mint year-round with just a little care and creativity.
